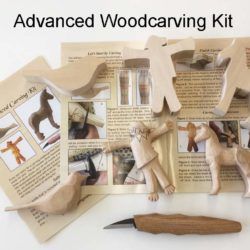
Woodcarving can seem daunting for beginners. Here are some tips and tricks to help you get started with your first animal carving job.
Dog
A lot of free woodcarving patterns are available online for aspiring woodcarvers. These patterns will guide your carving of your dog in a variety styles and dimensions. These are some of the tools needed to carve your canine friend. You will need a bandsaw, coping or chisel, a mallet and some time for sharpening. You're ready to start carving!
Eagle
The bald eagle is a traditional symbol of strength, courage, and wisdom to Native Americans. It was approximately 20 inches in diameter and five inches wide. Today, the eagle is a popular choice for wood carvings. There are a wide variety of woods for eagle carvings, from modern to antique. This article will show you some of the most common wood carving styles.
Bear
It is easy to carve a bear out of wood. Each line has an additional weight. To add visual interest, bears' front paws are angled against the leg lines to create more visual interest. For those who are just starting out in wood carving, a book can help you create a bear. James Miller's book provides a detailed explanation of the process.
Elephant
A stunning way to add personality to your home is to carve an elephant wood carving. 1stDibs has 56 antique carved wooden elephants and two modern pieces. These pieces were made as early as the 19th-century and have grown in popularity over recent years. You can choose from Art Deco (Mid-Century Modern), Folk Art, or a smaller piece for a subtle addition to your home decor.
Moose
The moose is an excellent animal for wood carving, and you can add antlers to it or create a beautiful head. Moose antlers and paddles attach to dowels. Push them in, or glue them in. After that, you will be able to paint the moose or use paint to color them.
Template for moose
Carvers can use a moose carving template to help them create realistic-looking carvings. You can paint moose carvings or stain them with walnut gel. After learning the basics of carving this animal, it's not difficult. Add details such as fur and eyes using a brush or a die grinder's typhoon bits. The Moose template is ideal for beginner wood carvers who want to carve an animal.
Bear template
To begin a bearwood carving, you will need to create a template. You can then use a Dremel instrument to examine the wood features. Stop cuts can then be used to separate the legs of the lower body with this tool. To indicate the split, you can make V-cuts in your legs. After completing the ear and leg parts, you can round the underbelly. Make sure to leave an open space at the back to continue to shape the bear.
Eagle template

Three templates are necessary to carve an Eagle. The first template is used for carving. The second template will serve as a working paper template. It will be cut to create transfer patterns. The third template will serve as a reference. Next, you'll use the tools provided to cut out main lines. Cut the lines so that they are close to the pattern. Make sure that all of the marks are aligned.
Mouse template
If you're new to wood carving, you'll find that there are several different designs to choose from. Using a template will make this task much easier, and there are even printable patterns available to help you along the way. A simple geometric pattern is a good starting point if you're just beginning. As you get more experience, you can start with simpler patterns. Once you've mastered the basics, you'll be on your way to creating the perfect mouse.
FAQ
What would you recommend as a starting material for woodworking?
You can start with softwoods like pine or poplar. After you are comfortable with the softwoods, move to hardwood.
Do you have any suggestions for starting a woodworking shop?
It's not easy to start your own woodworking business. If you are passionate about your hobby, it will not be difficult to put in the work. You might even enjoy running your own business.
One thing to keep in mind when launching a new venture is that you might encounter unexpected problems along the way. You might run out money, or you may have to borrow unexpectedly. Or you might find that your customers aren’t willing or able to pay as much you had hoped. To survive, you'll need to be prepared for such situations.
One tip is to have a separate banking account for your company. You'll know exactly how much money is coming in by setting up a separate bank account.
How can a woodworker start making money?
Many people are looking to create their own furniture and start an internet business. But if you're just getting started building furniture, there are other ways to earn money besides selling on Etsy. Local craft fairs and events are great places to sell your products. Or you could offer workshops for others who want to learn how to build their own furniture. Perhaps you have some experience as a carpenter/builder and would like to offer your services, such as remodeling homes and creating custom pieces.
How can you calculate woodworking pricing?
Remember to keep costs as low as you can when calculating project costs. Always ensure you are getting the best possible price for materials. You should also consider other factors that could impact the cost of your project, such as experience, skill level, time, and money. You can find an estimate of the cost of different woodwork projects in our guide to common DIY tasks.
What is the difference of plywood and particleboard?
Plywood is made of layers of wood that are pressed together under pressure. Plywood can be cut to different thicknesses. It's commonly used as flooring and cabinets. Particle board is made up of sawdust mixed in resin, then compressed into large pieces. It's used for home improvement projects. Both types of boards can be easily cut and are durable.
Is it possible to refinish your own furniture?
Yes! You don't have to hire a professional to refinish furniture. There are many ways you can do it yourself. Here are some examples:
Use sandpaper on the surface to remove any stains or scratches. After that, use a clean towel to wipe the surface.
Apply clear polyurethane finish. Let dry completely before moving furniture around.
Use acrylic paint to paint furniture.
Instead of using paint, stain is a better choice. The furniture will have a rich look thanks to the stain.
Use shellac wax. This will protect and shine the wood.
Do you know anything more about woodworking?
It is easy to underestimate the amount work involved with furniture construction. Finding the right wood is the hardest part. There are so many options for wood, it can be difficult choosing the right one.
Another problem is that not all wood has uniform properties. Some woods will warp and others will split or crack. Before purchasing wood, you should consider these factors.
Statistics
- In 2014, there were just over 237,000 jobs for all woodworkers, with other wood product manufacturing employing 23 percent; wood kitchen cabinets and countertop manufacturing employing 21 percent. (theartcareerproject.com)
- Average lumber prices rose about 600 percent between April 2020 and May 2021. (familyhandyman.com)
- Woodworkers on the lower end of that spectrum, the bottom 10% to be exact, make roughly $24,000 a year, while the top 10% makes $108,000. (zippia.com)
- Most woodworkers agree that lumber moisture needs to be under 10% for building furniture. (woodandshop.com)
External Links
How To
How to stain wood
Staining wood is the process of applying chemicals to the wood's exterior, which alters its color. The wood will turn from white to brownish-red due to the chemical reaction. Oak is the most common wood type for staining. However, you can also use other wood types.
There are many ways to stain wood surfaces. One method involves mixing the stain and a solvent and then spraying it on the wood. Some methods involve a mixture of water and dye that is applied directly to the wood. You can mix stains into varnishes or paints to make them part of your finish coat.
Preparing your wood for staining is the first thing to do. Clean the wood to get rid of any grease, dirt or other substances that might be detrimental to the stain's application. Sanding smoothens any scratches or rough spots. Next, you need to decide which stain you want. Penetrating stains are different from non-penetrating. Penetrating and non-penetrating wood stains penetrate deeper than other types, making them perfect for dark colors like mahogany. Penetrating stains are best paired with lighter colors, such as maple.
Once you have decided on the stain type that you want, get your tools ready. The best tool for applying stains is a paintbrush. It allows you to evenly distribute the liquid over the surface. A few rags are also handy to clean up any spillages after you have finished painting. If you are planning to mix your stain, ensure you have enough containers for each component.
After you have prepared your materials, clean the area you intend to stain. Clean the area with soap and warm water to get rid of dirt and grime. Wipe the entire piece of furniture with a rag dampened with clean water. You should remove any debris, especially if your plan is to stain darker wood.
Apply the stain next. Apply the stain by brushing or spraying it onto one side of the furniture. Slowly and carefully work your way along the grain to reach the opposite end. Make sure that the stain does not drip off the edge of the wood. Before moving on to the next steps, allow the stain drying completely.
Protect the painted surface with a coat polyurethane paint sealant. Three coats are recommended for polyurethane. Allow the third coat, which should dry overnight, to dry before sanding.