
There are many angles to consider when you cut crown molding. These angles include miter, diagonal and spring. Knowing which to use is critical for a proper fit. Here are some tips for measuring the angles of your crown molding:
A miter angle should be cut
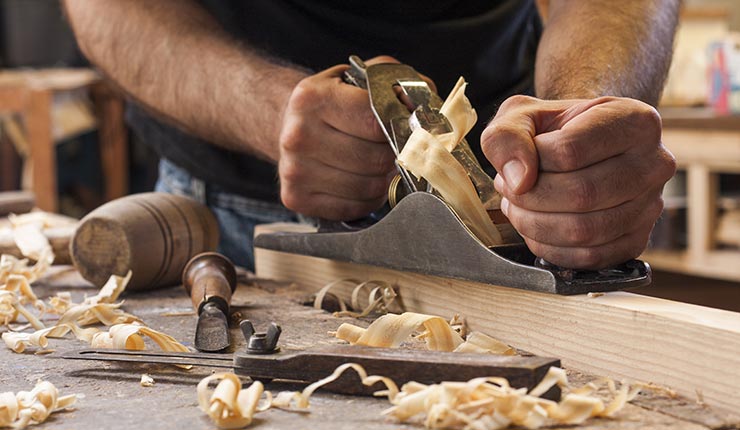
A power saw is the best way to cut miter angles for crown molding. To prepare a miter angles, turn the saw 45 degrees to either the left or right. Next, measure the length of crown molding from one corner. To confirm the exact length, slide a block under the crown. To ensure that the crown molding fits, you can use a measuring tape.
You can cut a bevel angle
It is important to know the angles of crown molding in order for it to be installed correctly. Most crown moldings are standard, so it is easy to know the angles. There are some factors that you need to consider when cutting bevel angles. The first is the spring angle. This refers to the angle between your molding back and the wall once it's been installed. Typically, crown molding comes in either 45 or 52 degrees, but you can find a chart that includes these angles.
Make a diagonal angle
You will first need to lay the crown molding flat onto your saw table. Next, make a diagonal cut approximately one-half an inch from one end. Keep going until you've completed the entire loaf. You will then need to cut another diagonal angle that is approximately the same size as the original one. The crown molding should be attached to the backerboard using a nail gun. This is a critical step that requires patience.
Calculate the spring angle
To calculate the spring angle for crown moulding, you need to know the wall width. A measuring tape can be used to measure the angle of corner cuts. A spring angle is the angle between the back of the crown and the wall when it is installed. The angle of crown molding is usually 45deg or 52deg. You can also use a test block to determine the angle of the spring.
Make a miter joints
Here are the steps for making a miter joints in crown molding: - Place the piece molding on the table. - Turn the miter base to the left. - Place the right end of the piece on the desk. - Cut the piece at the right angle. Save the right-hand end of the cut. - Increase the speed of your blade. - Maintain a firm grip. - Make sure the blade is out of the path of the molding.
Spring angles must be maintained constant
A finder or angle chart is required to ensure the crown molding's spring angles are consistent. An angle diagram is required because it indicates angles between the crown's front and the wall it will sit on. The typical angles for crown moldings include 45deg/45deg, 52deg/38deg, and 53deg/38deg. A test block can be used underneath crowns if you don't have an Angle Chart.
FAQ
Where can I find my woodworking tools?
There are many places you can get everything you need, and you don't have to go far. For example, you could visit local hardware stores or look online at websites like Amazon.com.
You can also search flea and garage sales for furniture and other materials that can be reused.
How can I tell what kind of wood I am working with?
Always read the label when purchasing wood. It should have information about the wood species as well its moisture content and whether any preservatives were used.
How long does it take to finish a piece of furniture?
It depends on which wood you choose, how complicated your design is and what amount of finishing you apply. Hardwoods, for example, require more maintenance than softwoods. Hardwoods are also more expensive than softwoods. But they last longer, and resist moisture better. The typical time taken to finish a piece furniture takes anywhere from one to three month.
Is it possible to open my own woodworking shop?
It is not easy to start a woodworking business. There are lots of legal requirements and regulations that you'll need to follow. However, it doesn't necessarily mean you must go through all the hassle of setting up a business. Many people join already-established businesses. This way, you only need to pay membership fees and taxes.
What kinds of woods are good for making furniture?
Woods are classified based on their hardness. Softwoods are pine, cedar and cypress. They are great for outdoor furniture as they resist rot. The hardwoods include teak, maple, mahogany and oak. Because they are not weather-resistant, they are best used indoors.
Can this be a way to make money?
Yes! Many woodworkers have this ability. According to the U.S. Bureau of Labor Statistics' (BLS), in May 2012 the median annual wage of woodworkers was $34,000 This is significantly higher than the national average, which is $31,000 per year.
Where can I purchase hardwood lumber?
Home Depot can sell hardwood lumber. They sell all kinds of wood products, including flooring, cabinets, furniture, etc.
A wide range of engineered hardwoods are also available, such as Ipe and Brazilian Cherry (Pau d'Arco), Mahogany and Swietenia Macrophylla.
These woods are available online by searching Google for "hardwood lumber".
Statistics
- Overall employment of woodworkers is projected to grow 8 percent from 2020 to 2030, about as fast as the average for all occupations. (bls.gov)
- The U.S. Bureau of Labor Statistics (BLS) estimates that the number of jobs for woodworkers will decline by 4% between 2019 and 2029. (indeed.com)
- Most woodworkers agree that lumber moisture needs to be under 10% for building furniture. (woodandshop.com)
- If your lumber isn't as dry as you would like when you purchase it (over 22% in Glen Huey's opinion…probably over 10-15% in my opinion), then it's a good idea to let it acclimate to your workshop for a couple of weeks. (woodandshop.com)
External Links
How To
How to join hardwood without using nails
Woodworking is an enjoyable hobby. It is relaxing and enjoyable because you can create something useful with wood. You may need to join two pieces without the use of nails. This article will demonstrate how to do so to preserve the beauty of your woodwork.
You will first need to trim the edges of your wood pieces before joining them. Do not leave any sharp corners as they could cause problems down in the future. Once you have done that, you can begin gluing your boards together.
If you are working with hardwood, only one side should be glue. If you're using softwoods like pine or cedar, you should put glue on both sides. Once you have applied the glue, press down on the boards until they are fully attached. Before moving onto the next step, make sure the glue has dried completely.
After you've glued your boards, you'll want to drill holes into the joints where you plan to insert screws. You can choose the type of screw to determine the size of your holes. If you plan to use a 1/2 inch wood screw, drill a hole at least 3/4 inches in depth.
Once you have drilled your holes you will need to drive the screws through each joint and into the backside. Don't hit the board's surface. You could damage the finish. Don't drive the screws too far into the end. This will prevent splitting in the end grain of the wood.
Once your project is complete, it's time to protect it against the elements. To do this, you can seal the entire furniture piece or just cover the top. You want it to last years, so you can use any product. Some examples include oil-based varnishes, polyurethane, shellac, lacquer, etc.
These products can be found in most home improvement shops. Make sure you get the right product for your job. Some finishes are toxic and should not ever be used indoors. Wear protective gear whenever you are handling them.