The joy of carving wood is enhanced by sharp edges. These are some of the common methods to sharpen your wood carving tools. Sharper edges will also last longer than duller ones and are therefore more durable. Sharp edges also ensure a more efficient use of your tool. Sharp edges are easier to carve and provide the best cutting performance. Below are three ways to sharpen wood carving tools. Read on to learn more. - How to sharpen a sharpening stones.
Sharp edges make carving more enjoyable
Sharp tools are not only better for carving, but tools with razor-sharp edges make it easier. Sharp tools take less effort and give you more control while carving. Also, the smooth surface of a sharply cut blade leaves a silky-smooth cut. For a successful carving job, sharp tools are vital. For optimum results, hone your carving tools regularly. Regular sharpening can keep them sharp and will make your carving job much easier.
Sharp edges can increase the pleasure of carving but they can also cause blisters. Wood's texture is natural and will not be smoothened with regular handling. Calhouns will develop from the blisters. However, this is a slow and painful process. You can try changing the way you hold your carving tools to reduce blisters. It will take practice, but it is worth it.
Use a sharpening knife and a fine grain stone to sharpen your knives. Check for any damage to the edge. Chips in the edge area will require more aggressive grinding. A dull edge may require minimal grinding on a finer grade grit. You can also test the knife by slicing through a piece or paper of rope. The knife may be able to be sharpened without the need for a sharpening tool if it has not been dulled in a while.
Common techniques for sharpening wood carving tool
There are many ways to sharpen wood carving tools. There are several options for sharpening wood carving tools. Oil stones require oil to apply to the stone's exterior to prevent metal particle embedding in the surface. The best stones for sharpening carbide tools are ceramic and diamond. They don't need oil. This article will cover the most common methods of sharpening wood carving instruments.
Leather strops can be used to remove the wire edge from a blade and polish it. Although leather strops can be used with all tools, some carvers prefer using a textured one. A flat leather strap is ideal for straight tools and the outside edge of gouges. Those who are serious about their work may want to invest in a leather strop with grooves.
Bench chisels are traditionally sharpened at a 25-degree angle with a five-degree secondary bevel. Modern alloys won't work well with these angles and can even cause them to corrode. As a result, you need to raise the angle of the bevel. This requires using more force and will result in less control. The same goes for block planes. They are often sharpened at an angle of 20 degrees.
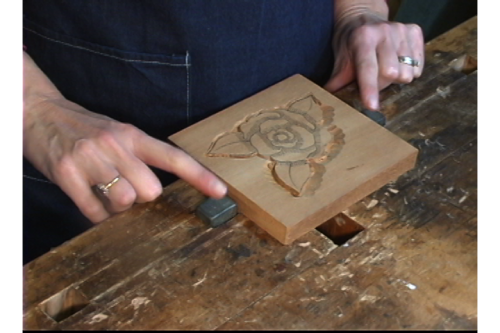
A sharpening stone is used
A sharpening knife is a tool that can be used for wood carving. A stone containing grit is a mineral in crystal form. It is stronger than steel and has sharp edge. Most stones will need a lubricant in order to cut properly and prevent metal particles from embedding into it. After you have sharpened your tool to a sharp edge, it will be easier for it to cut wood with minimal resistance. The strop, which is typically made of leather, polishes the edge and removes the burr.
There are many types and brands of sharpening tools on the market. There are oilstones (waterstones), ceramic stones, and others. Oil stones use oil as a liquid to keep fine metal particles and other contaminants from sinking into the stone. The lubricants that are needed for ceramic and diamond stones are not required. They are both effective in sharpening carbide wood carving tools.
Sentima is an excellent example of a high-quality sharpening system. It has both a coarse stone and a fine stone made from corundum. This material is uniform in grain, which makes for a fast cutting process and smooth finish. Its unique design also makes it easy to clean. The sharpening system is made out of durable materials and will last years without losing quality.
FAQ
Is it necessary to be a genius in woodworking to succeed?
No. It is not rocket science to woodwork. It is possible to learn basic tools and techniques that will allow you to create beautiful art.
Where can you find free woodworking blueprints?
You don't need to purchase any books or magazines to find free woodworking plans. Just search Google. Search Google for "free woodworking" to see hundreds of sites that provide free plans.
Can I refinish furniture that I make?
Yes! Yes! There are many methods to refinish antique furniture without hiring a professional. Here are a few ideas:
Use sandpaper to remove scratches and stains. Next, wipe the surface clean with a damp cloth.
Clear polyurethane varnish should be applied. Allow to dry completely before moving furniture.
Use acrylic paint to paint furniture.
Use stain instead of paint. The furniture will get a rich look with the stain.
Shellac wax can be applied. This will protect and shine the wood.
What is the difference between a hobbyist woodworker and a professional woodworker.
Hobbyists enjoy making things out of wood, whereas professionals focus more on the quality of their work. Hobbyists tend to take pride and share their creations with family and friends. Professionals spend hours researching design ideas before starting to work on a project. They will meticulously plan every detail of their work from choosing the right materials to finishing it.
How can my shop be organized?
First, make sure you have a designated space for tools storage. Keep your tools away from dust and debris, so they stay sharp and ready to work. Pegboard hooks can be used to hang tools and accessories.
Is it easy to start a woodworking business?
It can be difficult to start your woodworking business. You will need to adhere to many legal requirements. You don't have to go through all that hassle of setting it up. Many people choose to join existing businesses. You only need to pay membership and tax fees.
Statistics
- Average lumber prices rose about 600 percent between April 2020 and May 2021. (familyhandyman.com)
- Overall employment of woodworkers is projected to grow 8 percent from 2020 to 2030, about as fast as the average for all occupations. (bls.gov)
- Woodworkers on the lower end of that spectrum, the bottom 10% to be exact, make roughly $24,000 a year, while the top 10% makes $108,000. (zippia.com)
- In 2014, there were just over 237,000 jobs for all woodworkers, with other wood product manufacturing employing 23 percent; wood kitchen cabinets and countertop manufacturing employing 21 percent. (theartcareerproject.com)
External Links
How To
How to stain wood
Stain wood is a process that involves applying chemicals to the surface of wood, which changes its color. This chemical reaction causes the wood to change from white to brownish red. While oak is the most widely used type of wood for staining purposes, other types of wood are also available.
There are many methods to apply stain to wood surfaces. You can mix the stain with a solvent, such as turpentine, and spray it onto the wood. Some methods involve a mixture of water and dye that is applied directly to the wood. The stain can be mixed with paints and varnishes to become part of the final coating.
Preparing the surface for staining wood is the first step. Clean the wood to get rid of any grease, dirt or other substances that might be detrimental to the stain's application. Sanding smoothens any scratches or rough spots. Then you must decide what kind of stain you want to use. Penetrating stains are different from non-penetrating. Penetrating colors penetrate deeper into wood than those that are non-penetrating. This makes them more suitable for darker colors, such as mahogany. Non-penetrating stains work best with light colors like maple.
After deciding on the type of stain, you want to apply, prepare your tools. A paintbrush works well for applying stains because it allows you to spread the liquid evenly across the surface. After you're done painting, make sure to have some rags handy to remove any excess stain. If you plan to mix the stain yourself, make sure you have enough containers available to hold the different components of the mixture.
Once you have prepared all your materials, it is time to clean the areas where you will stain the wood. Clean the area with soap and warm water to get rid of dirt and grime. Wipe down all furniture pieces with a dampened cloth and clean water. Make sure you eliminate any loose debris, especially if you plan to stain darker wood.
Next, apply the stain. Next, apply the stain to the furniture by starting at one end. Slowly and carefully move along the grain of wood, slowly but steadily, until you reach the other end. Make sure that the stain does not drip off the edge of the wood. Before proceeding to the next step, let the stain dry thoroughly.
Apply a clear polyurethane sealant to protect the painted surface. Three coats of polyurethane sealing agent are required. Allow the third coat, which should dry overnight, to dry before sanding.